Table of Contents
Microsoft Outlook 2007
Updated Jan 11th, 2023 at 10:42 GMT
How to set up email in Outlook 2007#
This guide takes you step-by-step through the process of setting up a new email account in Microsoft Outlook 2007
*Note: This guide defaults to IMAP and SSL
*Note Replace example@example.co.uk with your domain name
Auto Account Setup#
New email account set-up with Outlook is quick and easy using the Auto Account Setup option. However, reasons to rather use Manual Setup are:
•if you prefer POP, as this automatic configuration defaults to IMAP
•if this is a new hosting account and domain propagation has not completed
Step 1. Launch Microsoft Outlook
Step 2. Select “Tools” then select “Account Settings”

Step 3. On the “Account Settings” field select the option called “New”

Inside the “Add New Account” windows select the option “Auto Account Setup”
*Enter your details under “E-mail Account” and click on “Next”
•You can safely ignore any warning messages.
•if you’ve lost your password you can change it inside your control panel.
Step 4. Microsoft Outlook will now “automatically configure” your account as an IMAP account with “all the correct settings.”
*If this option fails for some reason, try the Manual Account Setup below.
Manual Account Setup#
If you prefer to use POP3 , or your domain has not propagated yet, you will need to set up the account manually:
Step 5. Launch Microsoft Outlook
Step 6. Select “Tools” then “Account Settings”

Step 7. Select “Microsoft Exchange, Pop3, IMAP, or HTTP” and click “Next”

Step 8. Select the option “manually configure server settings or additional server types” and click “Next”

Step 9. Select “Internet E-mail” and click “Next”

Step 10. Enter all the relevant details (POP3 or IMAP) and then select the “More Settings” button.
• Outlook will “auto-fill your Username” – please ensure you fill in your “entire email address” as the username
• Use the same hostname for your Incoming and Outgoing Server (mail3.gridhost.co.uk or Cpanel Hostname)

Step 11. Select the “Outgoing Server” tab
•Ensure that the “My outgoing server (SMTP) requires authentication” checkbox is ticked
•Ensure that you have selected “Use same settings as my incoming mail server”

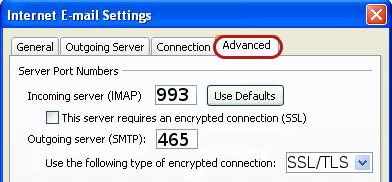
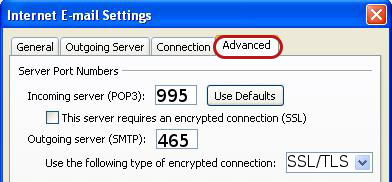
Step 12. Select the “Advanced” tab and ensure that your settings are as below for either IMAP or POP3
• Incoming 993 (POP3 - 995)
• Select: This server requires an encrypted connection (SSL)
• Use the following type of encrypted connection is SSL/TLS
• Outgoing 465 or 587
• Select: This server requires an encrypted connection (SSL)
• Use the following type of encrypted connection is SSL/TLS
• Root Folder Path - “INBOX”


Step 13. Click “OK” and then “Next”.
Step 14. Let the test complete and then click “Close”
Step 15. If you are experiencing any issues with setting up your email address you can always contact us via our Live Chat or open a support ticket. Opening hours are 9AM – 5PM Monday to Friday.
